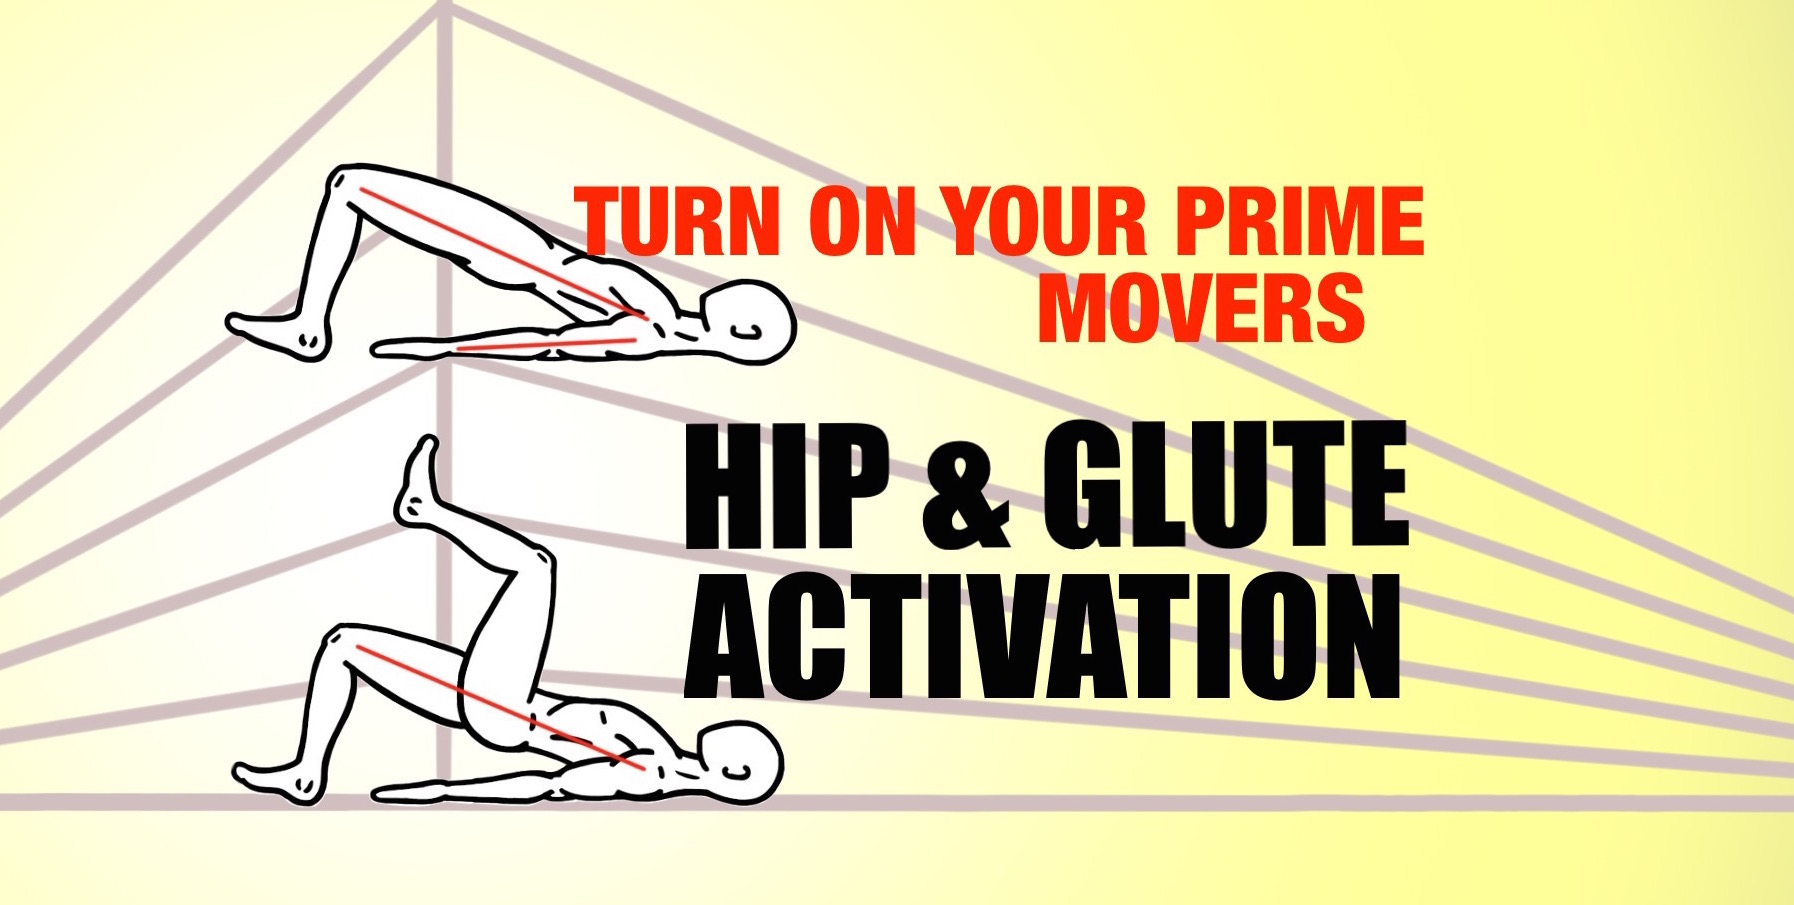
Run, walk, jump or squat? Your hips are doing most of the work. At least they should be. Yet, many people lose the ability to perform these basic movements as they are biomechanically designed due to modern living, which is why Hip and Glute Activation Exercises are an essential ingredient in an effective Prehabilitation Program.
Prime Movers
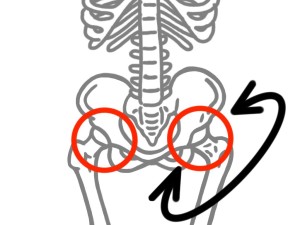
The hips are the ‘prime movers’ in any locomotion or traveling movement. This includes changing levels or heights as in a squat, jump, lunge and more. The hips are the body’s center of gravity and the foundation for the spine and upper body. Therefore, where the hips go, the rest of the body will follow.
The Hips are biomechanically essential to all locomotion or traveling movement.
Compensation Strategies
All too often, our modern lifestyle leads to dysfunctions in movement. The act of ‘sitting’ will lead to many different compensation strategies as the musculature of the hips learns to ‘turn off’ over time and will not ‘turn back on’ when needed to walk, run or jump.
Habitual sitting will reduce the efficiency of the neuromuscular connections that will ignite the hips musculature, which creates compensation in movement.
Alteration in Movement
In other words, the longer that a person will sit, the more that their hip muscles will not be able to work when needed. The neuromuscular connection to these muscles will become ‘inhibited’ or turned off (for a lack of better words). These inhibited neuromuscular connections will make it harder for the hips muscles, including the Gluteus Complex, to be active and maintain their strength or endurance. The end result is that they body begin to alter its biomechanics and create different strategies of compensation in their movement patterns.
Weak neuromuscular connections created from habitual sitting will alter the way that an athlete walks, runs, jumps, squats and more.
Strengthen Connections
Activation Exercises are designed to strength the neuromuscular connections to specific muscle groups in order to restore biomechanics and optimize movement strategies. When the body can use proper biomechanics, it will move more efficiency and be able to maximize output with minimal effort, which provides an athlete will more opportunities for success.
Activation Exercises help restore biomechanics and optimize movement by strengthening neuromuscular connections.
Hip Activation
Since the hip is a multi-directional joint, there are many different muscle groups to activate and strengthen. The following Hip Activation Exercises will target the Gluteus Complex (Gluteus Maximus, Medius and Minimus) as well as the Piriformis, Hip Flexors, Adductors and Abductors.
Success in Activation
If you are going to practice Activation Exercises, it will be helpful to have a way to gauge success. Otherwise, all your effort may be for nothing.
Ways to Measure
There are two ways that you can assess whether or not you have successful activated the targeted muscle groups: feeling and observation.
1) Feel the Muscle Group Activates
This is rather straightforward and simple: ask yourself if you can feel the muscles working.
2) Observation of Movement
Either have an experienced partner or coach to evaluate your movement in regards to alignment and form. Your alignment will reveal which muscle groups are responsible for producing the movement. You just need an eye that is experienced in observing movement.
Note: ‘feeling’ is rather subjective and we do not always ‘correctly’ feel the sensations in our bodies in regards to movement with a certain degree of accuracy. Therefore, it is best to measure your success with these activation exercises in a combination of ‘feeling’ and ‘observing.’
Accuracy in ‘feeling’ and ‘observing’ movement will grow with experience. Start today and you will be more experienced tomorrow-
Protect the ACL
Many people have developed compensation strategies in movement that threaten their ACL when they run, jump or squat. They have developed a “collapsing” of the ankle or excessive pronation of the foot, which is a precursor to ACL injuries because of the added torque that is absorbed by the knee. The collapsing of the ankle usually correlates to a lack of lateral stability of the hip due to an under-active Gluteus Medius. The following Activation Exercises will help strengthen the Gluteus Medius and restore the biomechanics of the ankle, knee and hip.
Activating the hip muscles will protect the biomechanics of the knees and ankles as well as help prevent possible non-contact ACL injuries.
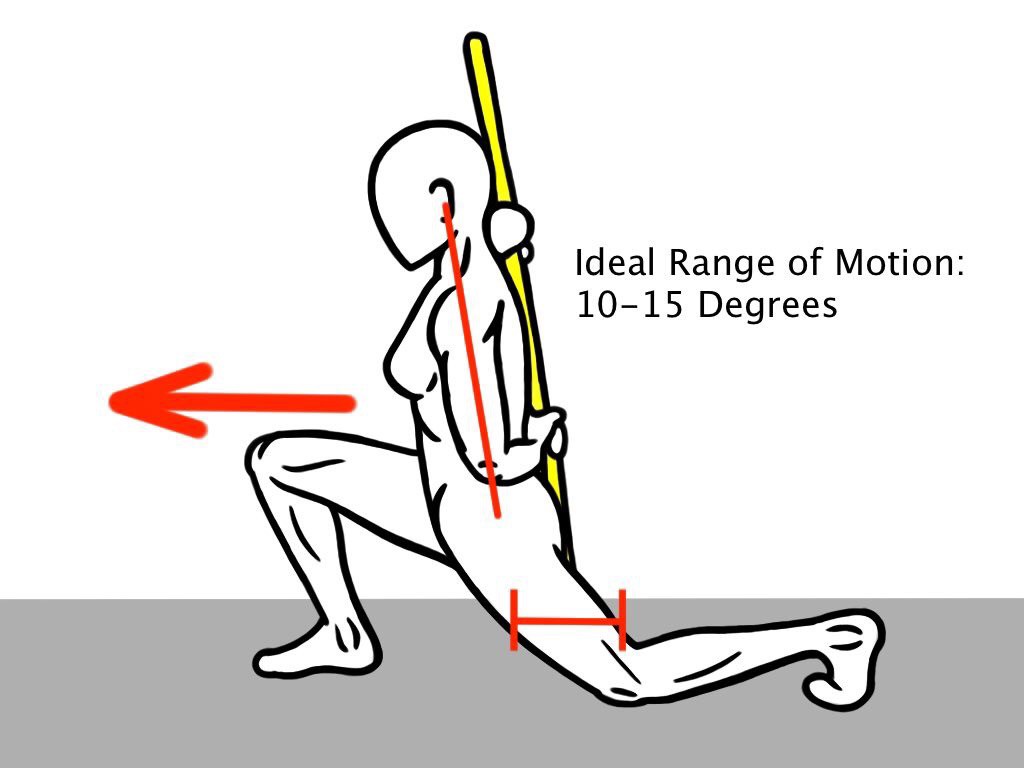
10 Degrees of Hip Extension
When you are walking, as well as running, your body is designed to use 10 degrees of hip extension. This means that your kneecap needs to pass behind the midline of the pelvis while having a neutral and stable spine.
A common compensation for a lack of hip extensions is over-extension of the lumbar spine. People will break the stable spine position in order to drive the leg backwards in the push-off phase of the walking, running or jumping. Alternatively, the body may also resort to overuse of the ankle and calf to help compensate for the lack of hip extension.
Activation Exercises will help improve hip extension and eliminate biomechanical faults in the way that a person walks, runs, jump and more.
Start with Soft Tissue Therapy
Before performing any of the following Activation Exercises, practice some Soft Tissue Therapy on the Hips and connecting musculature in order to improve the Range of Motion (ROM) as well as to restore responsiveness to the tissue.
Target Area: Hips
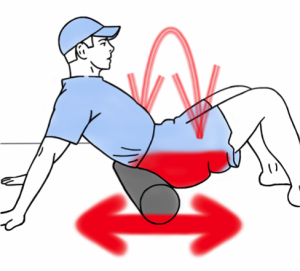
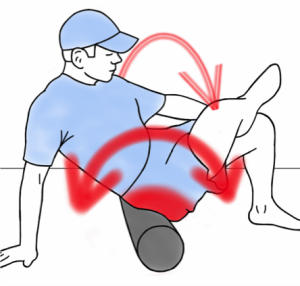
Sit and gently roll over the top of the foam roller. You want to cover the entire area of the hips, from the top of the pelvis to all the way under the “Sit Bones” or where your hamstrings and thighs connect to the pelvis.
When rolling over the hips, slowly turn the knees towards one side to rotate the angle of the hips on the roller. Incrementally changing the position of knees will help apply pressure to different areas of the hip’s soft tissue, which increases the effectiveness of this technique.
Target Area: Piriformis
Deep within the hip socket is the Piriformis muscle also known as the walking muscle. This is a small muscle that connects the Femur (thigh bone) to the Pelvis and initiates hip extension or the backwards stride phrase when you walk and run.
Sit on the roller and place one ankle on top of the opposite knee. Then rotate the hips slightly on an angle while rolling back and forth. Your body is angled towards the side that has the foot off of the ground. You should feel the roller pressing into the soft tissue deep within the hip, near the actual hip socket.
Target Area: Lateral Side of the Hips & Legs
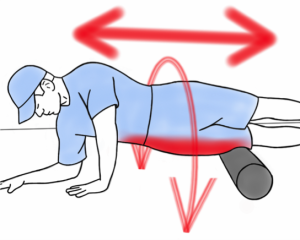
Lie on top of the foam roller and turn your hips 90 degrees onto their sides. Slowly roll down the side of your body from your hips down to your knees while gently oscillating or rotating along the way.
You will be applying pressure to the Vastus Lateralis, a muscle on the outside of your thighs, as well as to the Iliotibial Band, commonly referred to as your IT Band. Both of these soft tissue structures will get over-worked and stressed due to instability and the lack of mobility in the corresponding hip and ankle. Therefore, it’s important to include more exercises in your PreHab routines for Hip and Ankle stability and mobility if this area of your body is very sensitive or experiences discomfort while foam rolling.
Target Area: Quadriceps and Hip Flexors
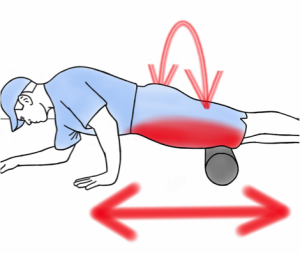
Lie on top of the foam roller with your hips facing the floor. Slowly roll over the front of your thighs and the hips while gently oscillating or rotating along the way.
You will be foam rolling your Quadriceps and Hip Flexor muscles, which both tend to be tight and inflamed in people with sedentary lifestyles as well as for those that wear high heels. The Quads and the Hip Flexors will commonly be over-worked and stressed as they attempt to compensate for the lack of Glute activation in many activities including running and lunging.
ACTIVATION EXERCISES – Floor-work
Tabletop Heel Lift
Start in a tabletop or quadruped position with the wrist aligned directly under the shoulder joints and the kneecaps directly beneath the hip sockets. Pull the belly button into the spine to engage the abdominals and hold the face parallel to the floor in order to create a neutral and stable spine. Next, drive one heel up into the sky as high as possible while keeping the knee bent at 90 degrees and maintaining a neutral spine. Do not allow your lower back to arch. Continue to pull the belly button into the spine s you press the heel into the sky.
Perform 5-10 reps on each leg.
Hip Hike
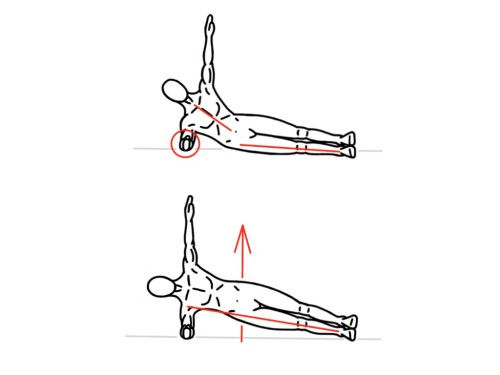
Lie on your side with the bottom elbow, hip and anklebone all aligned in a straight line on the floor. Make sure the elbow is directly beneath the shoulder joint. Next, press the hips up into the sky until the spine and legs are aligned in a straight line. Then lower down slowly and repeat several more times. This exercise will help activate the Gluteus Medius, which is located on the lateral side of the hip.
Perform 5-10 reps on each side.
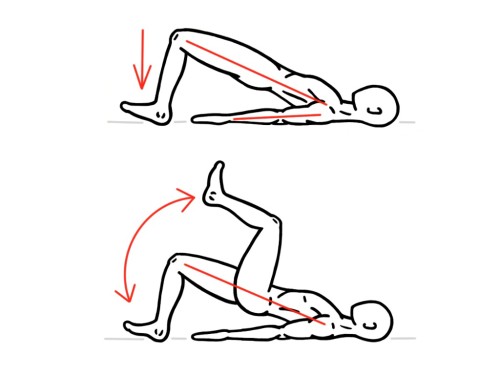
Bridge March
Lie on the floor with the knees bent at 90 degrees and the forefoot (toes) off the floor. Press the hips up into the air until they align with the knees and shoulders in a straight line. Next, begin to march the legs by reaching one knee up into the sky at a time. Make sure that the hips remain level with the floor. Do not allow one hip to drop towards the floor while marching; this is a sign of instability in the hip socket. Also, keep a neutral spine and do not arch in the lower back.
Perform 10-15 marches with each leg.
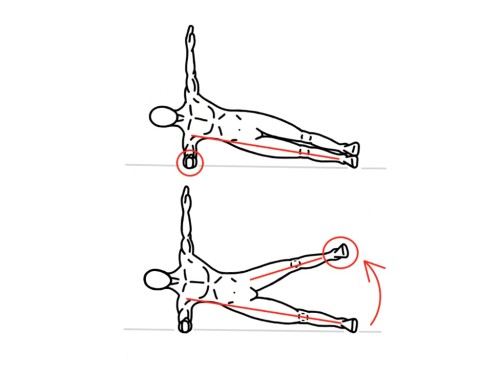
Side Plank Hip Abduction
Lie on your side with the bottom elbow, hip and anklebone all aligned in a straight line on the floor. Make sure the elbow is directly beneath the shoulder joint. Next, press the hips up into the sky until the spine and legs are aligned in a straight line. Now, begin to lift and lower the top leg several times while maintaining a straight-line alignment with the bottom shoulder, hip and ankle. Do no let your hips drop towards the floor or hinge backwards. Maintain a neutral spine and move with control. This exercise will help activate the Gluteus Medius, which will serve to protect the ACL.
Perform 5-10 abductions with each leg.
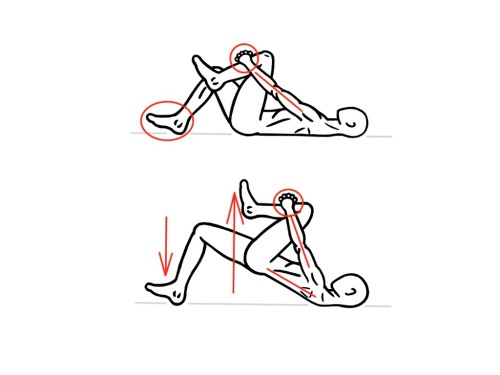
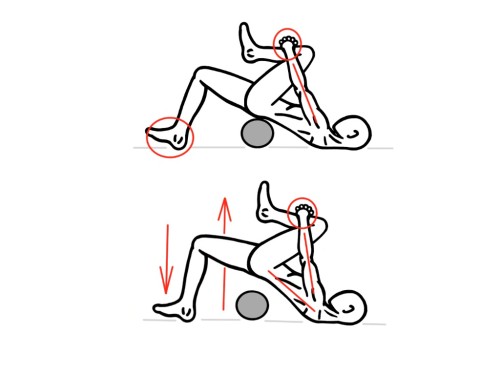
Single-Leg Bridge
Lie on the floor with the knees bent at 90 degrees and the forefoot (toes) off the floor. Press the hips up into the air until they align with the knees and shoulders in a straight line. Next, pull on leg into the torso and hug the kneecap tight into the heart. Then press into the floor with the opposite heel and drive the hips up into the air as high as possible. Lower down slowly and repeat several more times. Make sure that the lower back does not arch or over-extend and squeeze the leg into the chest as much as possible as this will lock the pelvis from ‘rolling’ when bridging. This exercise will help activate the Gluteus Maximus and Minimus as well as the Piriformis.
Perform 5-10 bridges with each leg.
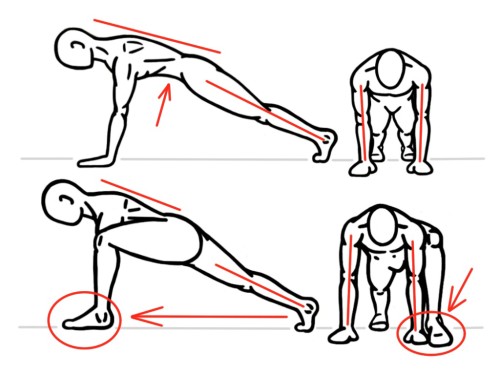
Spider-Man Lunge
Set up in the top of a push-up position with the hands placed at shoulder width apart. Align the shoulder, hips and anklebones in a straight line and hold the face parallel to the floor. Next, step one foot up to the outside of the same-side hand before returning the foot to tis original position and alternating sides. This exercise will help activate the Gluteus Medius and Hip Flexors.
Perform 5-10 lunge steps with each leg.
Single-Leg Bridge Off Roller
Set up in the same way as for the Single-Leg Bridge, but place a foam roller or a yoga block under the pelvis. Then pull on leg into the torso and hug the kneecap tight into the heart. Then press into the floor with the opposite heel and drive the hips up into the air as high as possible. Lower down slowly and repeat several more times. Make sure that the lower back does not arch or over-extend and squeeze the leg into the chest as much as possible as this will lock the pelvis from ‘rolling’ when bridging. This exercise will help activate the Gluteus Maximus and Minimus as well as the Piriformis.
Perform 5-10 bridges with each leg.
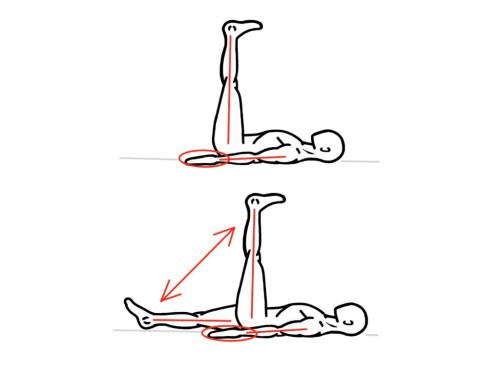
Leg Lowering
Lie on the floor and hold both legs up in the air with your arms by the sides. Straighten both knees and align the heels directly over the hip sockets. Next, lower one leg back down to the floor in a controlled manner before lifting it back to its original position. Keep your hips and torso very still as you lift and lower the leg. This exercise will help to activate the hip flexors, which are essential to sprinting.
Perform 10-15 reps on each leg.
Activation Exercises with Resistance Bands:
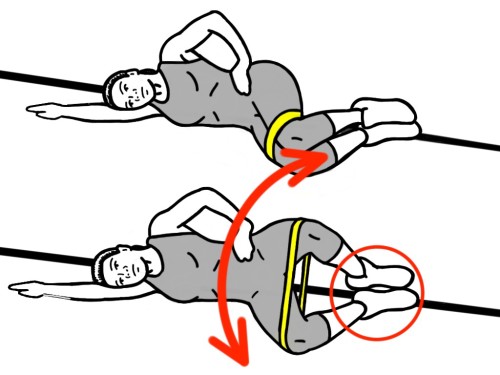
Clams
Lie on your side with a small resistance band placed around your thighs or shine, as close to the knees as possible. For best results, position your body up against a wall with both the hips and heels touching the wall. Next, pull the knees apart from one another while keeping the heels touching and maintaining a neutral spine. Open the knees as far as possible on each and every rep and close them in a slow and controlled manner. This exercise will help to activate the Gluteus Medius and protect the ACL.
Perform 5-10 reps on each side.
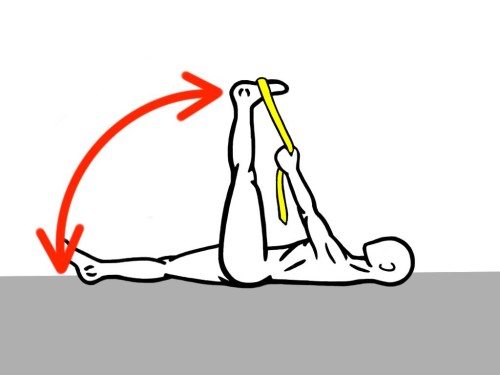
Assisted Leg Lowering
Lie on the floor and use a large resistance band or yoga strap to hold one leg up in the air. Straighten both knees and align the raised heel directly over the hips. Next, lift the free leg up into the sky and then lower it back down to the floor in a controlled manner. Keep your hips and torso very still as you lift and lower the leg. This exercise will help to activate the hip flexors, which are essential to sprinting.
Perform 10-15 reps on each leg.
Air Squat with Bands
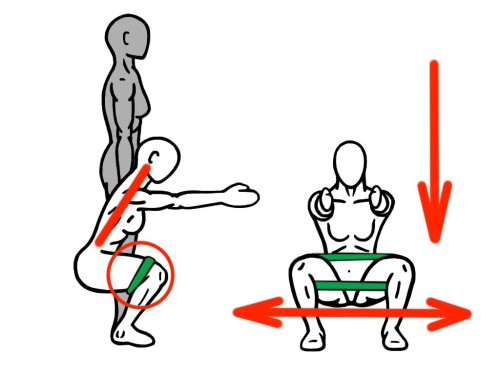
Stand with the feet shoulder width apart and wrap a small resistance band around the legs as close as possible to the knees. Next, squat the hips down to the floor as low as possible and then return to standing. Repeat this movement several times and on each rep, actively press the knee out wide against the resistance band in order to help activate more muscles in the hips.
Perform 10-15 reps of this movement.
Band Walks: Forward & Lateral
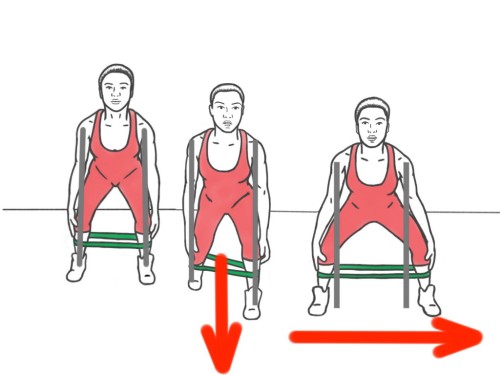
Stand in an athletic position with the feet shoulder width apart and wrap a small resistance band around the legs as close as possible to the knees. Next, walk forward while keeping the feet at shoulder width apart. Then, return to the same spot be walking backwards and keeping the feet at shoulder width apart. Next, walk to the side for several steps. Step out as far as possible on each step and then return to the same starting position. These exercises will help activate the Gluteus Medius and protect the ACL from injury.
Walk 10-20 steps in each direction.
Standing:
Air Squat
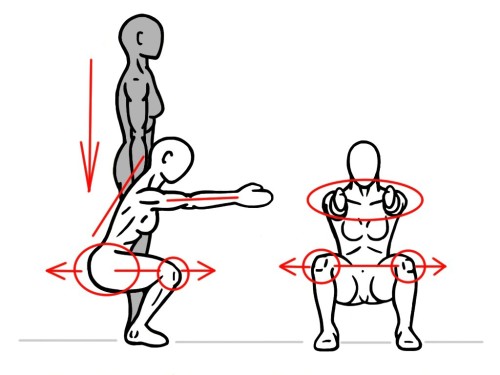
Stand tall with the feet shoulder width apart and toes pointed forward. Next, squat the hips down to the floor as low as possible and actively press the knee out wide in order to help activate more muscles in the hips. Then return to standing and make sure that the hips align directly under the shoulders before moving on to the next rep.
Perform 10-20 reps of this movement
Low-to-High Lunge
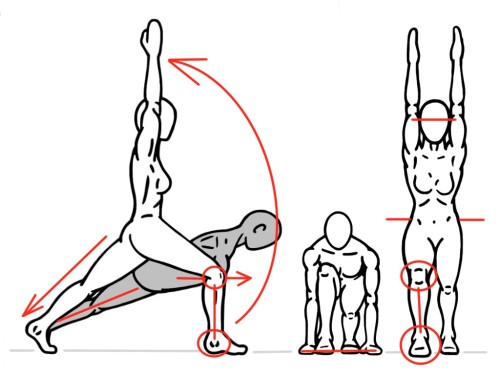
Start in the top position of a push-up and place one foot directly between the hands while keeping the back leg completely straight and the hips low to the floor. Next, rise up into a crescent pose, which has both arms reaching straight into the sky as high as possible as the front knee remains bent and vertically aligned over the front ankle. Then return to hands to the floor and repeat the movement several more times.
Perform 5-10 reps on each leg.
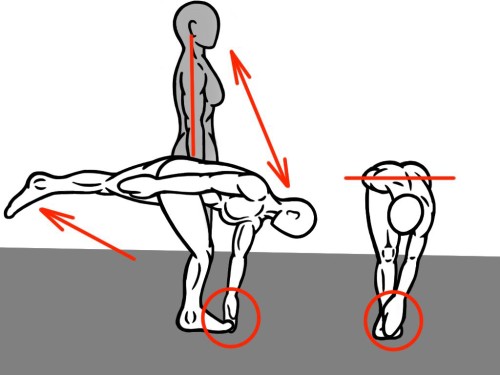
Single-Leg Toe Touch
Stand tall on one foot. Then reach down to touch the standing foot’s toes with the opposite hand. Reach the free leg back towards the horizon in order to initate a hip hinge and create the downward movement. Also, stay long in the spine and drive the hips forward in order to return to standing. This exercise will help activate the Gluteus Maximus and Minimus as well as the Gluteus Medius because balance is involved.
Perform 5-10 reps on each leg.
Curtsy Lunge
Stand tall and then reach one leg behind the other while squatting the hips down towards the floor. Aim the knee towards the outside of the standing foot and drive the hips backwards while reaching the arms forwards to the horizon to help keep the chest lifted. Lower the hips down towards the floor as far as possible before returning to standing and repeating this movement several more times. This exercise will help activate all of the posterior and lateral muscle groups of the hips and is an excellent exercise to use in any program.
Perform 5-10 reps on each side.
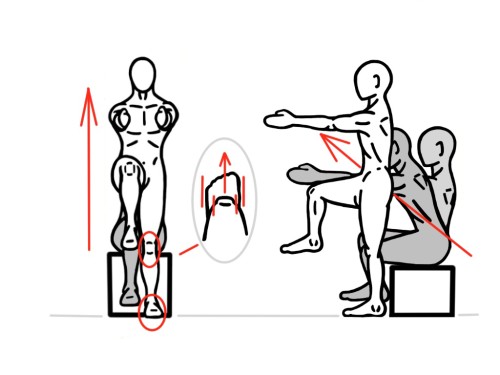
Single-Leg Squat to/from Bench
Sit on bench that is the same height of your kneecap. Lift a foot off the ground and then practice standing up using only one leg. Reach forward with both arms to initiate the upward movement and drive the heel into the ground to get to standing. Then press the hips backwards while reaching the arms forward to initiate the downward movement. Perform each phase of the exercise in a controlled manner and watch how the kneecap tracks over the toes. One of the goals in this exercise is to minimize the involuntary side-to-side movement of the kneecap while standing or sitting. This side-to-side movement is a sign of instability and an increase risk of injury, which is all the reason to practice this exercise more often.
Perform 5-10 reps on each leg.
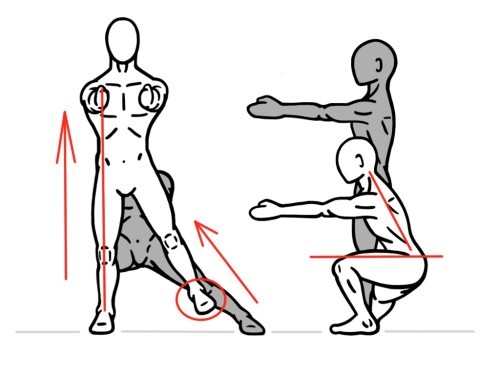
Lateral Lunge to Single-Leg Standing
Start from standing and then step out to one side into a deep lunge position. Reach the arms forward to the horizon and press the hips backwards to help lower the hips to the height of the knee or below. It’s important to get the hips as low as possible as this action will increase the Range of Motion and activate more musculature. Next, shift your body weight onto the lead leg (lunging leg) and pick the trail foot (straight-leg foot) up off the ground while returning to standing. Use only the lead leg to stand up. Limit the help that the trail leg will provide. This action will activate more of the musculature around the hip socket, as well as the ankle, and ultimately help to develop more stability in the hip.
Perform 5-10 reps on each leg.
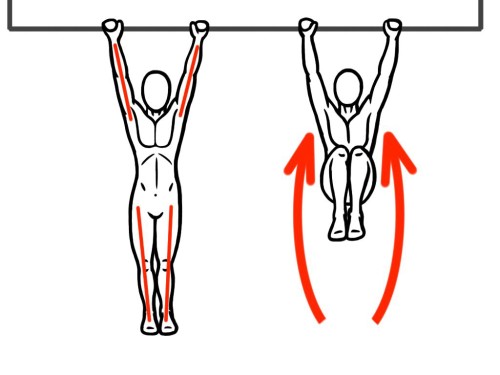
Hanging Knee Tuck
Hang from a bar with the elbows straight and the toes reaching for the ground. Do not rock back and forth, Start in a still position. Then pull both knees up towards the chest in a smooth manner. Again, do not rock, but attempt to keep the torso as still as possible. This action will eliminate momentum and help activate the Hip Flexors, as well as the abdominals. Lower the legs back down towards the ground and repeat several more times.
Perform 10-15 reps of this movement.
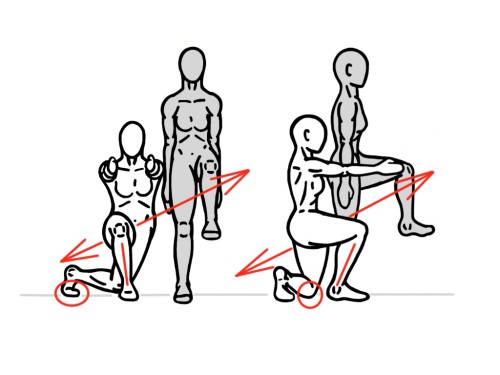
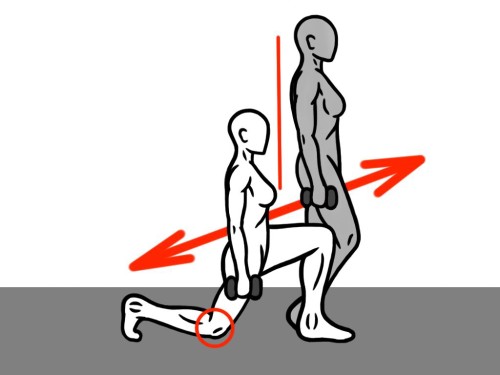
Retro Lunge
Also known as the Reverse Lunge or Step Back, the Retro Lunge will help activate the Glute Complex as well as the Posterior Chain, and can be a loaded (performed with weights) exercises, which will help activate more musculature in less time. Start in a standing position with the option of holding dumbbells in each hand. Next, step backwards with one foot and lower the knee down towards the floor. Do not let the knee touch the floor. Instead, get the knee as close to the floor as possible as this action will help lower the hips down into a deep lunge position and maximize the Range of Motion of the Glute Complex and Posterior Chain. After reaching a deep lunge position, return to standing by pressing the front heel into the floor and driving the hips straight forward while lifting the chest up into the sky. Repeat this movement several more times on each leg.
Perform 5-10 reps on each leg.
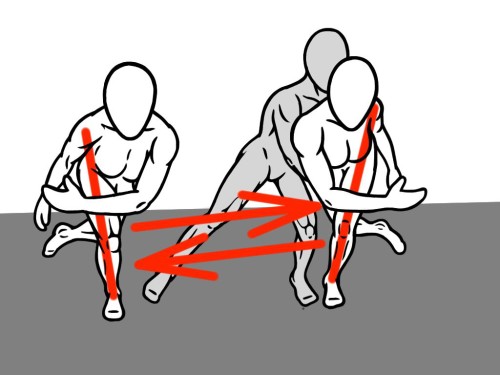
Speed Skaters
Stand in an athletic stance with the feet shoulder-width apart and toes pointing forward. Keep your chest high and lift one foot up off the ground. Next, laterally slide to the side s far as possible by driving the outside edge of the grounded foot into the floor. Keep the hips and shoulders at the same height as you slide from side-to-side and do not round the back or stand up. Stay low. Next, plant of the opposite foot into the ground and decelerate the momentum of your body as fast as possible and come to a complete stand still if possible. Once stopped, slide back to the original position by using the same process of driving the foot into the ground, staying low with the hips and planting the opposite foot into the ground to decelerate. This exercise will help activate the Gluteus Medius, which will provide more lateral stability as well as help protect the knee and the ACL.
Perform 5-10 reps on each leg.
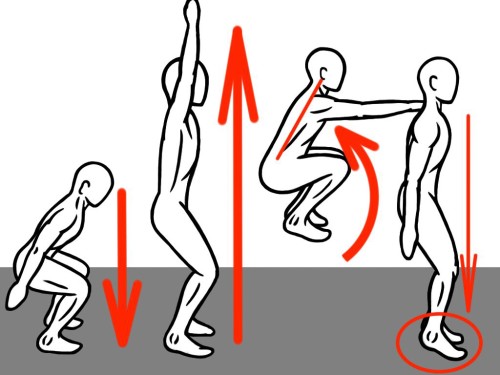
Tuck Jumps
Stand in tall stance with your feet shoulder width apart and heels lifted off the ground. Balance on your forefeet and hold your hands in front of your chest as you gaze at the horizon. Next, quickly dip your hips 3-6 inches and swing your arms down to the ground before exploding into a vertical jump. Keep your chest lifted and jump as high as possible. While jumping, quickly attempt to pull your knees up into your chest. This movement will require quick activation of the abdominals as you attempt to press the tops of your thighs into the front of your torso. After the knee tuck, quickly extend the legs back down to the ground and land on your forefeet. Attempt to land as softly as possible and try to not let your heels touch the ground. Instead, attempt to “stick” the landing and “catch” all of your weight on your forefeet. This exercise will help activate the entire hip complex as well as the Posterior Chain, Ankle and Foot Complexes.
Perform 5-10 jump tucks.
Board Jump
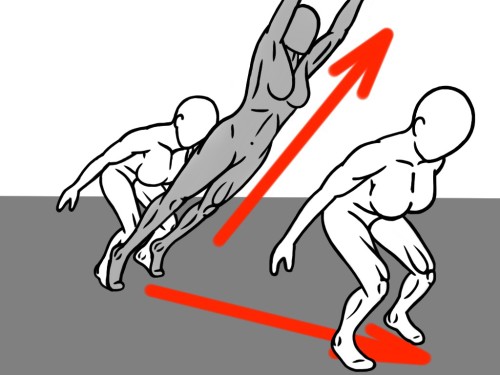
Stand in an athletic position with the nose vertically aligned over the toes, and the spine in neutral alignment parallel with the shins. Do not allow the back to arch or round. Keep the chest lifted and press the hips slightly back while reaching the arms forward towards the horizon. Next, quickly swing the arms backwards and drive the heels into the ground before exploding into a forward jump and swinging the arms back up into the sky. ‘Pop’ the hips forward and jump as far as possible in a relaxed and smooth manner. Allow the physics of this movement to activate the musculature of the hips.
Perform 5-10 jumps.
Vertical Jump
Stand in an athletic position with the nose vertically aligned over the toes, and the spine in neutral alignment parallel with the shins. Do not allow the back to arch or round. Make sure that the hips hinge and bend both the knees and ankles in order to form this athletic stance.
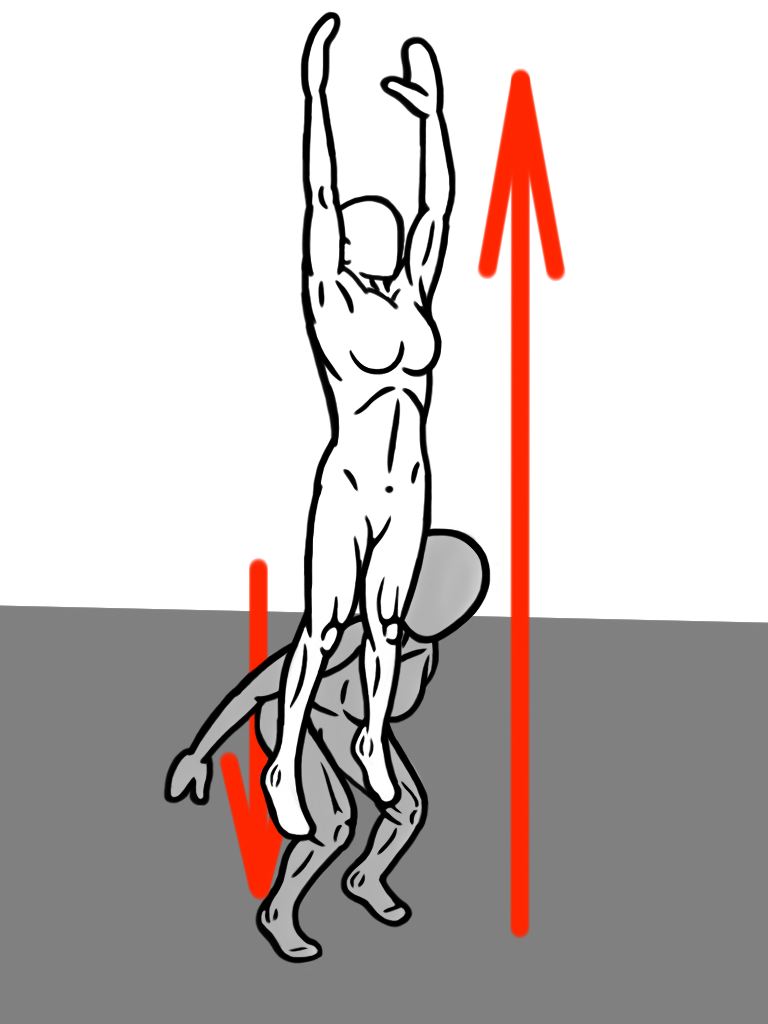
Next, drop the hips down towards the ground in a small little ‘dip’ movement and then jump straight up as high as possible by sending the hips forward and up while driving the heels into the ground and pressing through the balls of your feet. Also, pull the belly button into the spine to engage the abdominals and support the lumbar spine as you jump. Perform this exercise in a smooth and relaxed manner on each rep and allow the physics of the movement to activate the musculature of the hips.
Perform 5-10 jumps.
Back Squat
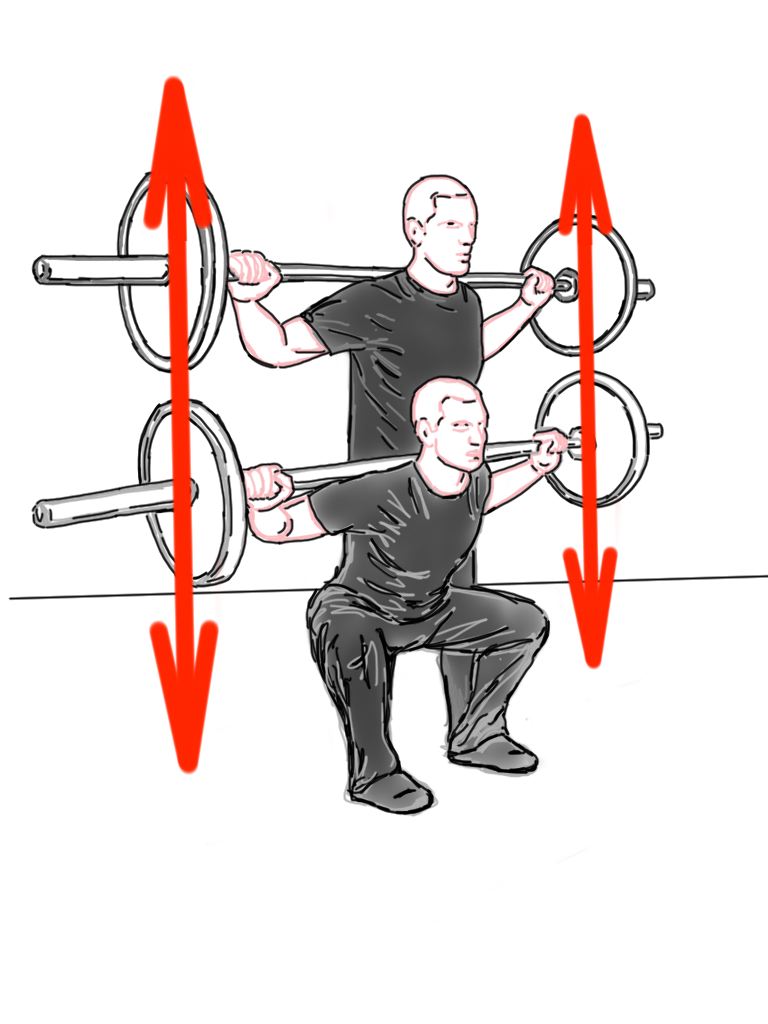
Stand with the feet shoulder-width apart and the hips vertically aligned over the ankles. Either hold a barbell along the top of the shoulders blades or hold a dumbbell with both hands in a vertical position against the chest in a ‘Goblet’ position. Pull the belly button in towards the spine to engage the Abdominals and support the Lumbar Spine.
Next, sit the hips down towards the floor and keep your chest lifted. Bend the knees and lower the hips down to the height of the knees. Also, keep your shins as vertical as possible and do not let your knees pass in front of your toes. Press the thighs wide to make room for the torso when lowering towards the floor. Do not arch your lower back. Keep the spine long and the chest high as you sit as low as possible.
Next, drive the heels into the ground and press the hips forward to come back to a full-upright standing position with the hips vertically aligned over the ankles. This exercise will help to activate the Hips, as well as the Posterior Chain and Quadriceps, especially when ‘loaded’ or using weight.
Perform 5-10 squats.
Video Playlist: Hip PreHab
Practice Standing
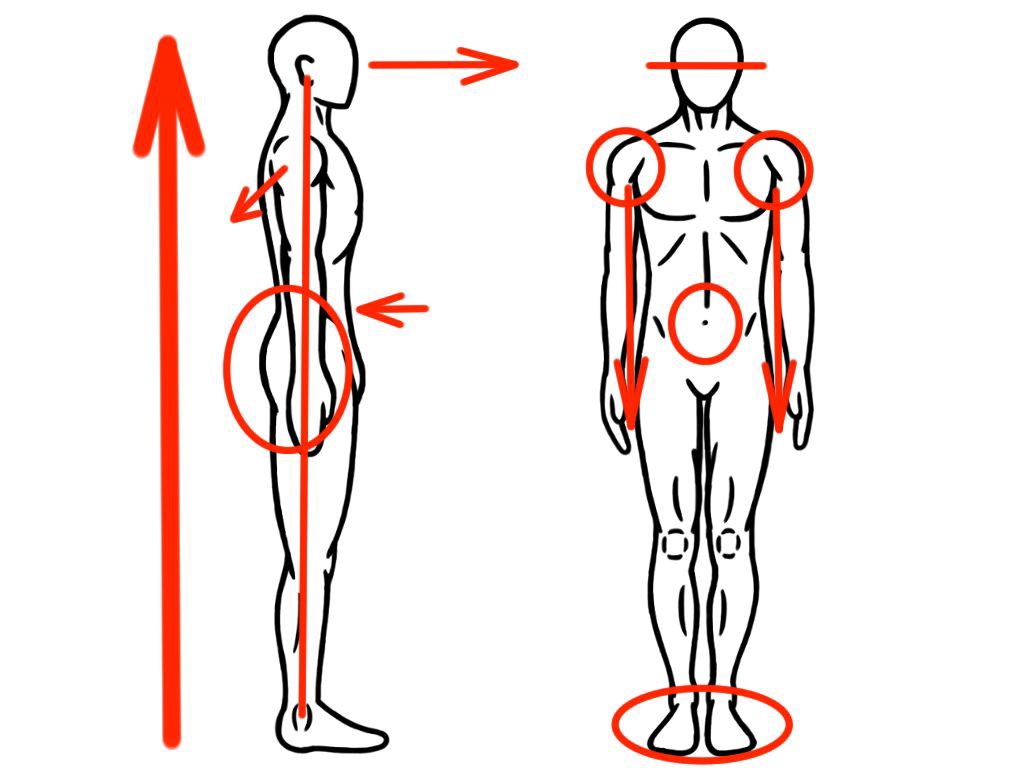
Once you have developed a sense of what it feels like to activate the muscles of your hips, try to keep the glutes turned on as much as possible – even when just standing!
The more that you practice using this neuromuscular connection, the more facilitated it will become. In other words, the more that you practice squeezing your glutes, the easier it is to recruit them when you go to run, stand up or just move!
And once movement gets easier for you, you will move more often. And that’s great in a world where sitting is predominant. So, practice standing and turn on the Glute Complex and Hips as much as possible every single day!
For even better results with Activation Exercises, practice Soft Tissue Therapy!
Learn more about Soft Tissue Therapy – CLICK HERE
For increased Speed and improve Agility for sports, Activate the Foot and Ankle!
Learn more about Activation Exercises for the Foot and Ankle – CLICK HERE

2 thoughts on “Hip and Glute Activation – Turn On your Prime Movers”